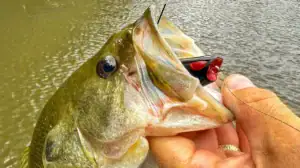
Bladed jigs have become a very popular bass fishing bait since they exploded onto the scene from Ron Davis’s workshop a little over a decade ago. The only downside to them, however, is how easily they snag wooden cover like brush piles, laydowns or docks.
Because of the big exposed hook and design of bladed jigs, if you cast them into gnarly wooden cover there is a high probability you’ll become snagged.
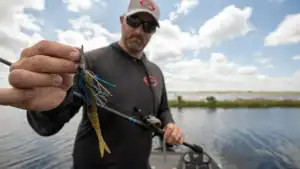
That changed for pro angler Terry “Big Show” Scroggins once he figured out how to make his vibrating jigs weedless. Although he was reluctant about it, Scroggins has agreed to share his process after a few years of keeping this tackle tweak hidden from the public eye.
The thought process behind it

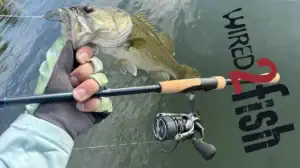
Being a Florida native and no stranger to fishing lakes with an excess amount of grass, Scroggins fishes with a Chatterbait very regularly. It was after one successful day of bladed jig fishing during a Florida winter that got Scroggins thinking about making his ChatterBaits more resistant to hang-ups.
“A buddy and I had spent the day on a little lake in Central Florida and we caught the heck out of them on Chatterbaits,” Scroggins said. “We were fishing around a few brush piles in 8 feet of water and the bass were loaded up. The biggest bass we caught came on a Chatterbait, but the problem was we had to break off a lure every few casts because we kept hanging up in the brush. While driving home that night I couldn’t stop thinking of a way I could make bladed jigs more weed less.”
Using nothing more than a power drill, a tube of marine epoxy and a spool of 200-pound monofilament, Scroggins discovered a relatively quick and easy method of accomplishing his goal.
Drill the holes

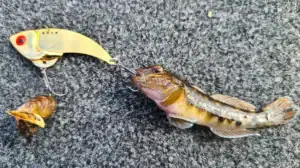
Scroggins starts by taking the skirt off of his Chatterbait and then uses a 3/32-inch drill bit and a power drill to create the holes for his weed guard to sit in. He has found a 3/32-inch bit is perfect for the 200-pound mono he likes to use. Depending upon what you use for your weed guard, this may change.
Scroggins advises using a drill bit slightly larger than what you intend on using for a weed guard. While Scroggins is partial to heavy monofilament line, he has also experimented with weed eater string along with thin, pliable wire as weed guards.
Scroggins settled on monofilament for several reasons. It’s much cheaper than other options and it’s also clear, so it doesn’t change the overall profile of the lure. It’s also stiff enough to deflect snags, but pliable enough that he can form-fit his weed guard to whatever shape he chooses.

“Start by drilling two shallow pilot holes straight into the head of your Chatterbait,” Scroggins said. “Start slowly and even add a little beeswax or Vaseline to your drill bit so it doesn’t try to run on you. Once you have the two holes started, move your drill bit to the angle you would ideally have your weed guard sit, and drill into the head of the bait 1/4-inch or so. You don’t want to drill all the way through the head, obviously, you just want a deep enough hole for your weed guard to sit in.”
Place your weed guard
After his holes are drilled, Scroggins rolls one end of his two weed guards in marine epoxy and then simply places them inside his Chatterbait head.
“The epoxy only takes about five minutes to dry,” Scroggins said. “Let your bait sit and dry for three or four minutes until your weed guards are mostly set. Then with your last 60 seconds or so you can gently move your weed guards around so they lay out exactly like you want them to. Start by using a weed guard that’s a little too long and then trim them with a pair of scissors after the epoxy has dried.”

Once your epoxy has dried, add your favorite skirt color, a soft-plastic trailer and your bladed jig will be ready to meet the deepest, darkest, hidey holes a bass calls home.
Scroggins hasn’t noticed the homemade weed guards affecting his hook-up ratio and insists the weed guards last through countless fishing trips if allowed to dry properly.
Is it worth it?
Realistically, this tackle tweak is not something you need to do to every vibrating jig you own. Adding a weed guard is strictly situational for Scroggins. If he is planning on fishing open water or a grass flat, Scroggins won’t make any adjustments to his bladed jigs whatsoever.
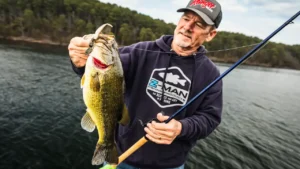
However, if Scroggins is fishing a Chatterbait around dock cables or heavy cover he won’t hesitate to add a weed guard. The increased snag resistance gives Scroggins the confidence to make pinpoint casts in hard to reach places, in addition to assisting the lure to come through snags more easily. Therefore Scroggins is able to put his vibrating jigs in places bass aren’t used to seeing them, resulting in more bass in the boat.

![[VIDEO] Casey Scanlon’s Go-To Trailers for Bladed Jigs](https://www.wired2fish.com/wp-content/uploads/2025/06/scanlon-trailers-300x169.webp)