After many decades of troubleshooting and repairing boat wiring issues, I’ve become pretty darn good at figuring things out. Today’s boat wiring is one of the most difficult problems you’ll run across due to requirements of the numerous accessories.
For the last several weeks, I have been chasing a problem that has been causing me to lose sleep at night. Every time I think I have it fixed, it seems like another issue pops up and I’m back to square one. I finally conquered it by fixing a ground and using isolated power with a heavier guage wire.
This issue got me thinking that I’m probably not the only one that has experienced these headaches. So I wanted to make a short checklist that might help you if you run into a similar issue. If you’re just getting started working on your own boat wiring, these are some rules you should certainly follow.
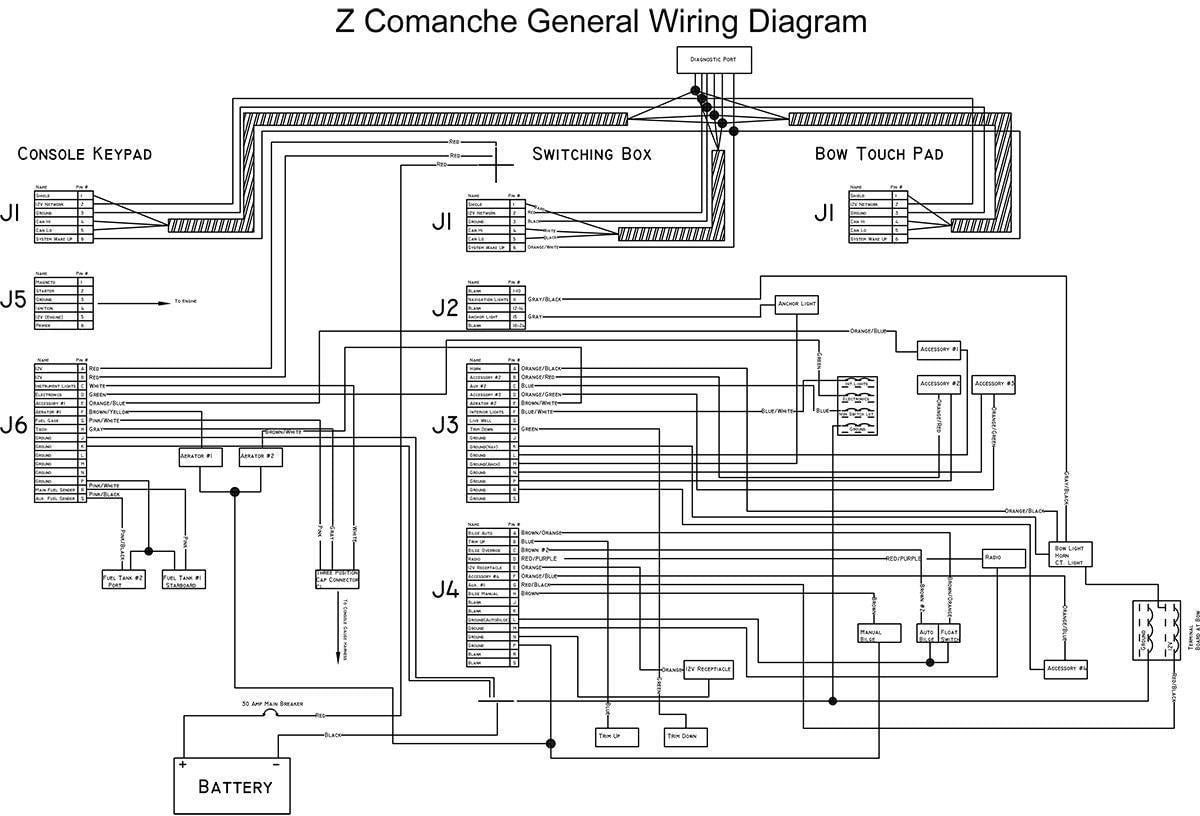
Check for a wiring schematic
Unfortunately, not all boats have them. For as long as I can remember, however, Ranger has included one in most of their boats. Rather than purely guessing, having that roadmap can be huge when you’re tracking down problems.

Make detailed notes of any repairs
When adding accessories, it’s imperative to make clear notes in your phone or on a sheet of paper detailing how you rigged it. If a problem arises a few months after you did the work, you’re probably not going to remember exactly how everything is laid out.
I always use color-coded wire with red for positive and black for negative. This takes a lot the guesswork out of the problem solving.

High-grade connections and dielectric grease
Use high-grade connections and always use dielectric grease and shrink tubing on connections. You should never skip this step because it will save you a lot of trouble over time.
A good set of powerful crimpers are an excellent investment, too. Liquid tape is another inexpensive purchase that can protect against shorts. If you’re using electrical tape, make sure to cut it instead of pulling it when wrapping; it will stay on the wire much better.

Tighten terminals
Always tighten battery terminals snugly on the battery posts. A good rule of thumb is to put the smallest leads on the bottom. Use the box-end of the wrench when tightening as it is less likely to slip and bloody your knuckles.

Loose connections
A loose connection can cause a short or more resistance and which will keep your battery from performing optimally. Loose leads can use more power and significantly decrease your battery life.
Always hook up the positive lead first, too. I also replace all wing-style nuts with nylock. They hold much better and are less susceptible to loosening due to vibration.

Buy a good multi-meter
They are inexpensive and can solve a problem quickly. Battery power is DC, or direct current, so set up your meter for that. I also have a battery load tester, too. These can point out a bad cell quickly and save you a lot of time.
Here’s a good selection of multi-meters from Amazon.

Modern electronics eat power
Today’s electronics are big-time power hogs. A good group 27 or 31 battery is the best choice to power them and I strongly ecommend a deep cycle over a starting battery for this application because they hold a longer charge.

Use cable lubrication
When applicable, use lubrication when pulling wire through chases and never pull too hard; this can shred everything in the wire if you’re not careful. If it gets snug during the pull, back up and re-pull as nicks and scarring of the shielding can cause problems down the road including dead shorts.
Not only will your equipment not work, but bad wires can result in a fire.

Use zip ties to bundle wire
A limited amount of zip ties is the best choice as they can snag if wiring need to be worked on.
Never pull zip ties into a chase. Use ferrite rings or RF coils around electronics to dampen radio frequency interference. You can get ‘em cheap and they can be huge for removing trolling motor interference on electronics screens.

Use the proper wire gauge for the application
Load requirement and distance from the battery will help determine proper gauge wire and fuse requirements. For example, a trolling motor on a 20-foot boat should have 4 or 6 gauge wire for best battery utilization.
Every problem cannot be solved with this checklist, but it will give you a good starting place. Study schematics, never be afraid to attempt the job and if necessary, enlist expert help in the form of a reputable dealer or manufacturer and you can cut the down time significantly. Boat owners should never cut corners on wiring jobs.