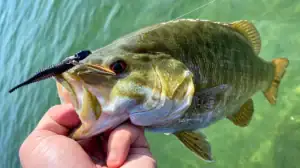
Fishing lures are expensive, but they’re not as dispensable as you might think. The next time you find an old fishing lure—whether it’s in a forgotten tackle box or on the bottom of your favorite lake—don’t throw it away. With a little work and the right approach, you can often bring it back to its original luster and functionality.
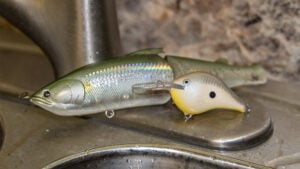
I was swimming off the dock this past weekend and found an old dock rope tied to a stump. Upon further inspection, I discovered two old lures covered in rust and muck; a Lucky Craft Real Ayu 178 glide bait and one of my favorites, a Rapala DT6 crankbait. I wasn’t about to throw them away.
I spent about 30 minutes cleaning them up and with some elbow grease and the right products, I was the proud new owner of $27 worth of bass fishing lures. One man’s trash had become my treasure.
Here’s how I did it.
Step 1: Remove hooks and split rings
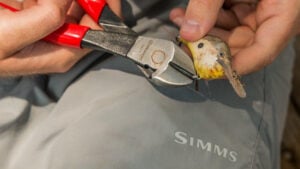
The hooks and split rings are the first thing to go when a lure is forgotten or abandoned. The metal quickly gathers rust and in a matter of days they can be entirely useless.
So before I began the restoration process, I took a pair of side cutters and removed all of them; even if they looked remotely salvageable. They can be replaced easily and don’t cost much, so it’s simply not worth the risk for me. In addition, this makes the cleaning process much easier and safer.
Step 2: Rinse with warm water

Once the components are removed, it’s important to rinse the lure with warm water to remove as many abrasive impurities as possible. If you start scrubbing beforehand, there’s a big chance you will cause irreparable damage to the lure’s clear coat and paint.
It’s tempting to rub the surface of the lure with your fingers during this process, but avoid it if possible. Instead, use the spray setting on your kitchen sink to rinse any stubborn areas.
Step 3: Gently rub with dish soap

When you’re able to run your fingers over the lure without feeling any dirt, apply a liberal amount of Dawn dish soap to a wet paper towel and gently scrub the surface of the lure. This will remove a large majority of the grime.
Every few seconds, feel the lure with your bare hands. The smoother the surface, the harder you can scrub with the wet paper towel.
Step 4: Toilet bowl cleaner and a toothbrush
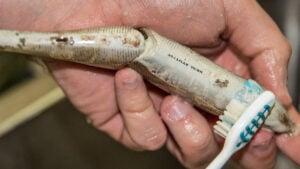
While the dish soap will make a big difference in the lure’s appearance, there will still be some bad areas that need attention. Do not—and I repeat—do not use any harsh cleaners that contain alcohol. They are likely to strip the clear coat and paint from the lure, leaving you with an ugly pile of wood or plastic.
A non-abrasive toilet bowl cleaner and a soft-bristled toothbrush will work wonders. Spray a liberal amount of the cleaner directly onto the lure, wet your toothbrush and lightly scrub the problem areas; I’ve found a tight circular motion to be most effective.
Repeated rinsing is suggested throughout this process in order to avoid removing the clear coat or paint. I scrubbed for about 20 seconds, rinsed, checked to make sure the lure was holding up, reapplied the cleaner and continued scrubbing.
Be sure to scrub the bill or, when applicable, any joints in the lure. These areas often contain the most crud after being exposed to the elements.
Step 5: Final rinse
Rinse all of the cleaner off of the lure with warm water. For good measure, I took my lures outside and sprayed them thoroughly with a hose. This will remove the remainder of the impurities.
Step 6: Apply light oil (jointed lures only)

This isn’t a necessary step for traditional hard lures, but if you’re lucky enough to find a fancy glide bait or swimbait, it helps to apply a light household oil to any moving parts.
The joint of my Lucky Craft Real Ayu 178 glide bait were toast; they would barely move side to side. After applying some Lucas Tool Box Buddy and working the joint back and forth, the lure performed flawlessly within 20 seconds or so. I was pretty surprised, actually.
Step 7: Spray wax
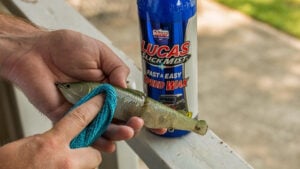
At this point in the restoration process, both of my lures were looking pretty darn good. At first glance, it looked almost as if they’d just been removed from the package. But they lacked any shine or luster.
I didn’t think this would work, but it did: I sprayed a bunch of Lucas Slick Mist Speed Wax on the lures and let it sit for approximately 5 or 10 seconds. Next, I took a microfiber rag and rubbed them until dry. With a separate, dry microfiber, I polished the surfaces and the results were incredible.
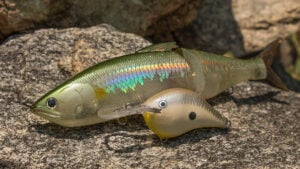
I couldn’t be happier with how my project turned out. As you can see from the photos, this process made a big difference and allowed me to turn two nasty lures into fully functioning, beautiful additions to my collection.
The next time you run across an old, neglected fishing lure, don’t throw it away. Use this process and over time, you can amass an impressive collection of good-looking—and free—fishing lures.