I’ve been talking electronics a lot with anglers the last month or so, and I am learning that a lot of fishermen have anxiety when it comes to how to use electronics when fishing. Maybe anxiety is not the right word, but they are just overwhelmed with all the settings, so they end up doing nothing except turning the graphs on and off.
Luckily for anglers, the technology is so good in fishing depth finders and chart plotters today that they work really well out of the box. But they work a whole lot better if you make a few changes to your settings to get a clear picture.
Sonar is a massively cool technology, and to me side scanning and down scanning are two even cooler technologies. Most anglers who fish from a boat have some sort of sonar, so we’ll start there and save the side scan and down scan tweaks for another article.
Sonar sends a ping down to the bottom and receives the “bounce back.” The softer the bottom the less return or bounce back the transducer gets from the ping. The harder the bottom or object in the cone of the ping, the more return you will get. These “returns” are then interpreted and plotted on a digital screen.
Think about it like this. Go scream in your pillow. You don’t hear much. Now go stand next to the wall in your bedroom and scream at it. There is a much louder echo or “return” on your scream.
In essence what you are doing when tweaking your sonar settings is trying to capture as much return on the ping as you can. The sonar has to receive its signal amidst a multitude of interfering objects like boat turbulence from an outboard, waves, water density, sediment stirred up, other objects in the water reflecting noise, and other units on “pinging” in the same area.
It’s a wonder we can see anything at all on our graphs. So I’m all about clearing up my picture when on the water so I’m not missing anything when I’m hunting fish, whatever the species.
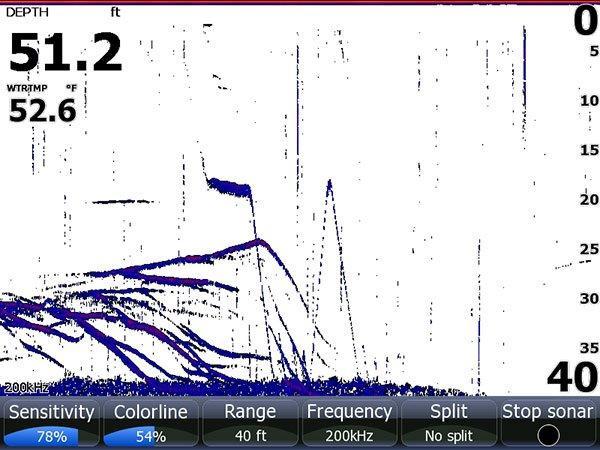
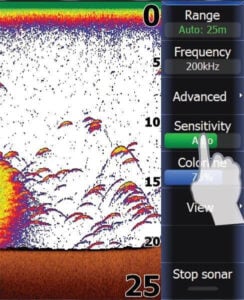
The first thing I do to my sonar settings is set the range for the depth I’m fishing. The graph can change up and down automatically as you change depths. But if I’m only concerned about bass shallower than 40 feet and I’m fishing in 25 feet of water. I want to see the bottom but I want the full screen focused on the area I’m fishing. I don’t always trust my graph to give me the full picture. Sometimes it will set it automatically to 60 feet even though I’m fishing in 30 feet. So I just manually set it to 40 and I’m rock solid fishing in depth.
Next I will bump up the sensitivity. It’s probably set to Auto by default but you can manually set it to whatever level you want. To me there is no magic number. I start around 75% and work up from there. I will go up and down and watch my screen as I do to see if I’m suddenly seeing baitfish I was missing or bass or cover or if I’m just getting a lot of noise on my screen. When I find that happy medium I will go with that for a while. Different fisheries or times of the year might require different sensitivity settings.
On my Lowrance Unit I have the option to also adjust the colorline. The color line can tell you a lot about how dense something is that you’re seeing on your sonar. Again I start by moving the colorline slider up and down until I think I am getting the clearest picture. I want to be able to see those yellow-bellied bass easily on my graph.

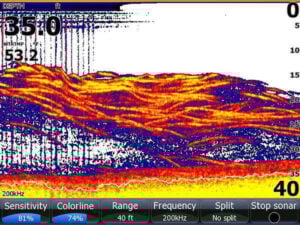
After I’m getting a good picture with sensitivity and colorline, I will then make sure I’ve only got one transducer pinging at a time in my boat. I have two units in my boat. When I pull my trolling motor. I punch the stop sonar quick key on my HDS 8. For two reasons. I don’t want my transducer pinging into outer space as I run to my next spot because the transducer sometimes has a hard time locking back onto the bottom when I drop the trolling motor at the next location. By stopping and starting my ping on the transducer, it locks on immediately and I can start fishing instantly without being frustrated waiting for the sonar to figure out again that it’s in the water.
The other thing I do as I move to the front deck to fish is reach down and punch the Power button on the console unit and click the Standby option. That standby option turns the back graph off without turning it off. Basically it shuts down the transducers without powering down the unit. So you can quickly get scanning again at the touch of a button but you won’t have all the noise that can be caused by two graphs pinging in the same small area. The clutter is amazing as you can see in this picture.
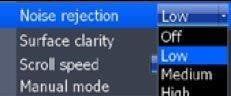
The last thing I will do is set my noise rejection and surface clarity settings. The fact of the matter for me is I’m not looking for individual fish in 2 feet of water. So I really don’t care what’s immediately under the surface. I will set my noise rejection to low and surface clarity to low. And I end up getting a very clear picture when I’m fishing. I can see my lures when I drop them right under the transducer. I can watch fish literally react to my lures on the screen and work a cat and mouse game on the graph until the fish bites.
Lots of good anglers successfully vertically fish much like one would ice fishing except they do it from the bow of their boat. Having a clear picture is the key. You spent a bunch of money for tools to help you find the fish, so you owe it to yourself to get the most out of them. And remember there is no one right setting. You need to continually change your settings to get the best picture as you move from deep to shallow or change areas where more clutter may be prominent or you’re getting harder or softer returns.

![[VIDEO] How Brandon Palaniuk Uses the One-Boat Network App](https://www.wired2fish.com/wp-content/uploads/2025/06/one-boat-network-300x169.webp)
![[VIDEO] How to Install the Garmin Force Pro Trolling Motor](https://www.wired2fish.com/wp-content/uploads/2025/06/trolling-motor-install-300x169.webp)