For those of you that don’t know, I inherited a buddy’s 2001 Triton a couple years ago when he passed. This afforded me a ride when I couldn’t afford one otherwise without incurring a lot of debt. My buddy who owned the boat previously, Neal Webster, was a marine and an electrical engineer. There are things he did to this boat over the course of two decades that I am having quite the adventure figuring out how to troubleshoot now.
It’s been a journey getting the boat dialed in and retracing some of his innovative and, at times, meandering fixes. What a blessing the boat has been. A surprising blessing at that, to be somewhat forced to learn how to work on it.
I’m not naturally mechanically inclined. Thus I don’t have a lot of confidence in the “do it yourself” arena. Owning and working on this boat has challenged me to stretch and grow as an angler, and as a human in general. The latest project was adding a recessed foot tray for my trolling motor, which is what I want to talk about today.
THE ISSUE AT HAND…OR RATHER, AT FOOT
These days, almost all new bass boats come with recessed trays for the foot pedals that control the trolling motors. This has been a relatively new feature to become standard. However, boats manufactured prior to the early 2000s, have the foot pedal simply sitting on the flat front deck of the boat. Running a trolling motor with the foot pedal this way requires a very unnatural stance, the “Captain Morgan” as it’s often called, with one knee jacked up in the air.
This stance is rough on the knees and creates a lot of fatigue throughout the course of a day on the water. The solution is to mount the foot pedal to where the top is somewhat flush with the deck of the boat, to create a more natural stance with both feet flat on the ground. This has been a feature that new boats have and now older boats can have it too, thanks to products like the Baldwin Iron Works Recessed Trolling Motor Foot Pedal Pan Tray.
MY SITUATION
Neal had already added a recessed foot tray to the boat a decade or more ago. Unfortunately, the brittle metal it was made of began to crack before I took ownership of the boat, and this old tray pales in comparison to what’s available now. Neal had tried caulking the crack that formed in it, I did as well, but the pressure of pushing down on the pedal had finally taken its toll. The resulting bucket full of water that would get dumped into the front tackle compartment every time it rained had become a real problem. A more permanent fix was needed.
A quick Google search revealed a stylish and sturdy looking tray from Baldwin Iron Works. I called the number on the site which went straight to Paul Baldwin’s cell. I explained the situation, what I do for a living and asked if he’d be open to me reviewing the product or doing an install piece in exchange for it. He graciously agreed and my tray arrived in the mail within a week. The rest is, as they say, history. Or at least it will be in a few paragraphs.
WHAT YOU’LL NEED
Many of you may not know this, but I also have an engineering degree: PHD in redneck engineering. The SOP for professionals in this field (or standard operating procedure for you lay people), is to run headfirst into a wall and then try to figure out what went wrong as I shake off the impact like a Looney Tunes character with stars circling my head.
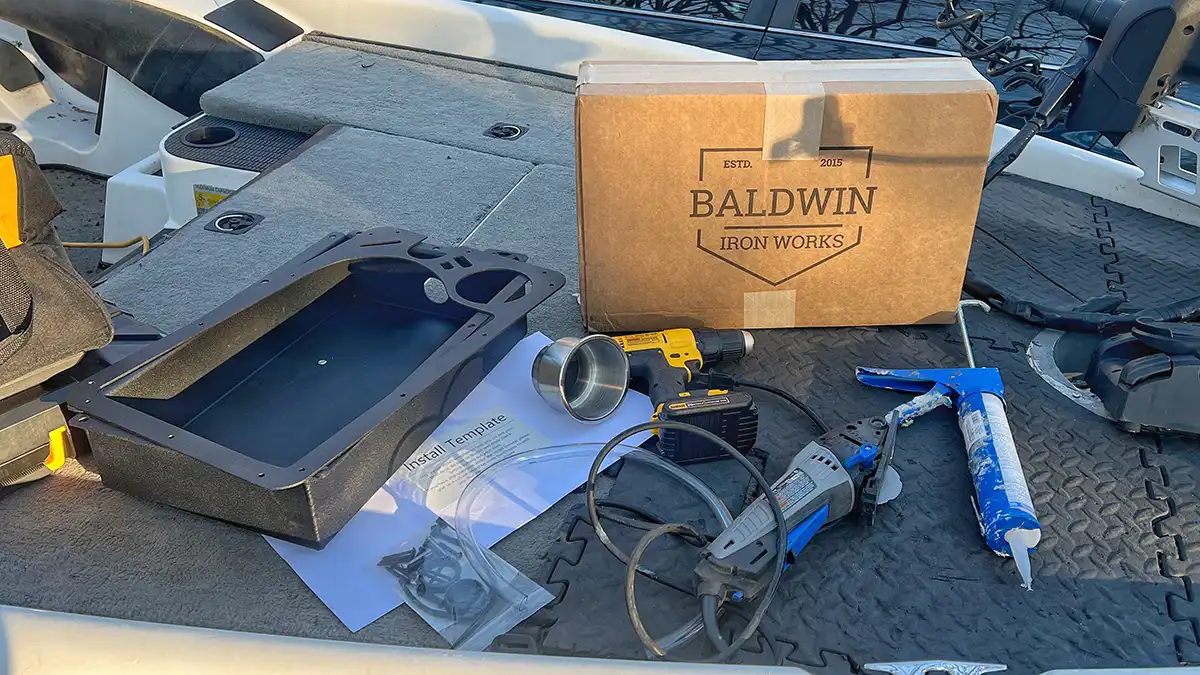
All this to say, there are some great tutorials on the Baldwin Iron Works website. Admittedly, I should have looked at these first. I, instead, figured it out as I went. I took to the deck of my boat with a Dremel tool with a circular saw blade. However, it didn’t cut quite deep enough, and wasn’t able to lay flat on the deck. Baldwin had a good idea; they recommend a jigsaw instead, with the appropriate blade for whatever deck material you have.
The company also provides a paper template, which is very helpful. You’ll want to wear eye and ear protection as well as a mask, especially with fiberglass boats. Long sleeves and gloves are also a good idea, especially with fiberglass. You’ll also need a drill.

PRETTY EASY INSTALL, ALL THINGS CONSIDERED
Now remember, I’m not mechanically inclined, and, more importantly, I’m hard headed and unwilling to follow instructions. This was a fairly easy install. Neal had already done a lot of the necessary cutting of the deck to make way for the old foot tray, I just had to square off the corners and widen the opening a bit.
It is important that you make absolutely sure you’ve measured everything out correctly before cutting into your deck. If anything, cut the hole a little small. You can always cut a little more off if needed. You’ll want a tight fit, there’s about 3/8 inch of room between the edge of the screw holes and the edge of the opening in the deck.
Once you get the hole cut into the deck, you can insert the tray to make sure it fits. Then use the pre-drilled holes in the tray to drill pilot holes into the deck for the screws that come with the tray. Drilling pilot holes is especially important with fiberglass and metal decks. Take your time here, or you’ll break several bits.
Once you’ve done this, pull the tray back out, zip-tie the included drain hose onto the drain spout and then run that hose into the hull of your boat. This will keep water from pooling up in the tray, which could damage the foot pedal. It instead safely dispenses it into the bottom of the boat.
Now you’re ready to install the tray. Take the faceplate and position it over top of the inserted tray. Line the holes up and begin inserting your screws, make sure you’ve started them all before tightening any of them. You’ll notice the faceplate holes are smaller than the respective holes in the flange of the tray. This will allow the faceplate to act as a washer for each screw head.
Finally, take the included stainless steel cup holder and peel off the adhesive backing found below the rim. Make sure the faceplate is clean where the cupholder will mount, and then insert the cupholder, pressing firmly around the rim to ensure a good bond.

IN CONCLUSION
The install took me a couple hours, though that time could have been cut in half had I taken advantage of the resources on Baldwin’s site and had the right tools on hand. Even with me bumbling and stumbling through it, it wasn’t that bad and the end result is awesome.
I now have a sturdy and clean foot tray that sheds water to the right places and eliminates a lot of fatigue. An added bonus is there are incorporated slots for tools like pliers and scissors. The convenience of the added cup holder allows me to keep my coffee or a couple plug knockers handy.
I received this product for free in an agreement that I’d review it or do an install piece if I liked it. This was a no-risk, no-brainer for me to give it a try. My opinion: I do love it, and even if I had paid the $145 for the model I received, I’d still be tickled with it. It’s a solid product that accomplishes an essential task.
**Baldwin offers trays with pre-drilled holes to mount Minn Kota, Lowrance and Garmin foot controls for $149.99, as well as a universal tray for $134.99.


![[VIDEO] B&W Tow & Stow Hitch Review With Mark Davis](https://www.wired2fish.com/wp-content/uploads/2025/03/BW_TowStow_Hitch-300x169.webp)
![[VIDEO] BoatEFX Console Graph Mount Review](https://www.wired2fish.com/wp-content/uploads/2025/03/BoatEFX-SingleConsole-mount_review-300x169.webp)